Hello
guys, After a long time, I am writing an article on our blog. Today, I
am back with new cool article in which I will describe how to create Gmail account without phone number / OTP verification.
Yes!! You don’t need new mobile number every time while making new
account on Gmail. All you need is just a Android mobile or PC/Laptop for
this guide.
How to create Gmail account without phone numberAre you looking for way to make Gmail account without phone number?
Yeah!! Off course, that’s why you are here. Gmail is the best mailing
site of Google which is loved by billions of its users. It’s more better
than other sites like Yahoo mail or Hotmail. You can receive or compose
unlimited mails on Gmail. When you creates a account on Gmail, it ask
to enter your mobile number for verification. You can’t skip phone
number verification on Gmail. It will send an OTP on your number and you
must have to enter it into the box to successfully create your account
on Gmail. Also
you can’t use same mobile number for making new account on Gmail. This
is also another big problem for Gmail users. Now what to do? How to use same mobile number again and again on Gmail? Don’t worry, I will describe two ways in this guide. First one is for the users who want to create Gmail account without mobile number verification and second one is for those who want to use same phone number again and again on Gmail. There is no big requirement to follow this tutorial. You just need an Android phone to create account on Gmail without phone number. And if you want to create more than one Gmail account with same mobile number,
you need PC or Laptop for it. Now you are able to make new Gmail
account without entering phone number or any type of One time password
verification. So it isn’t a cool trick? It is the best hack ever which
helps you to create Gmail account without phone number.
Here
is the trick to create Gmail account without phone number verification.
In this method, you just need an Android phone for making Gmail account
without any type of OTP verification. Let’s read all the steps carefully
and make unlimited Gmail accounts without mobile number.
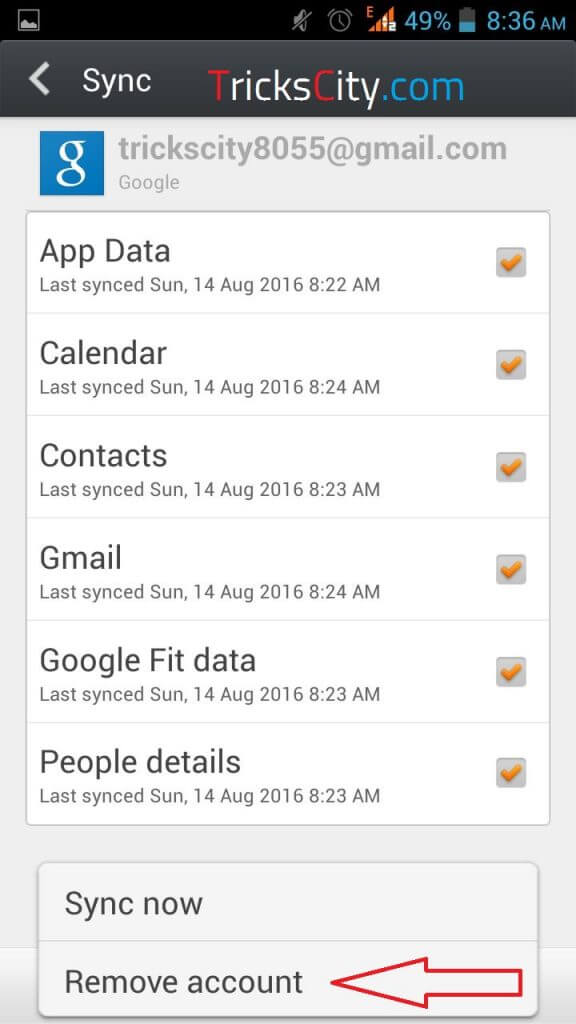
1) First of all you need to Logout all the Google accounts from your Android phone.
For removing already signed in Google accounts from your device, just go to Settings >> Accounts >> Google >> Remove.
Make Gmail account without phone verification
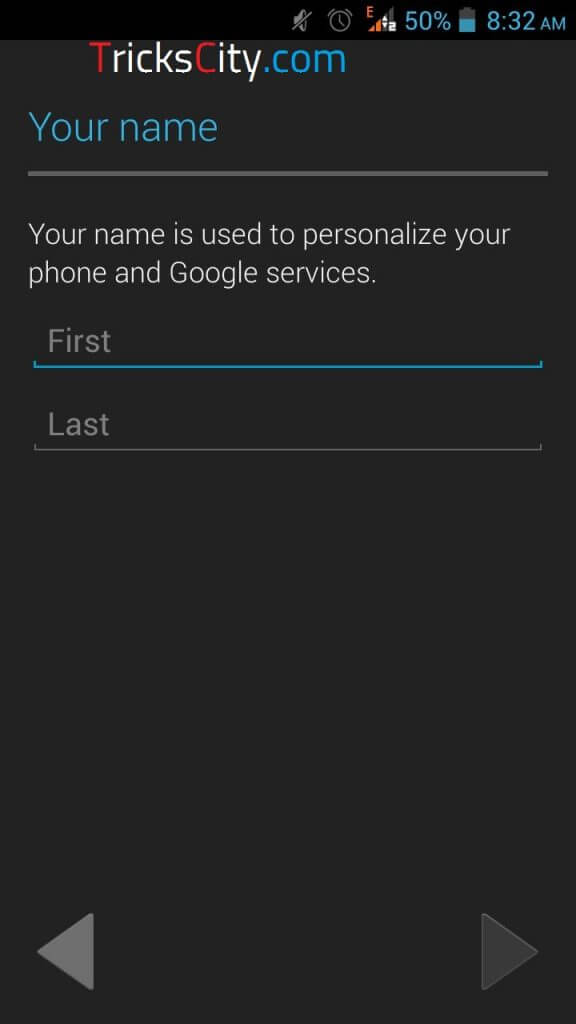
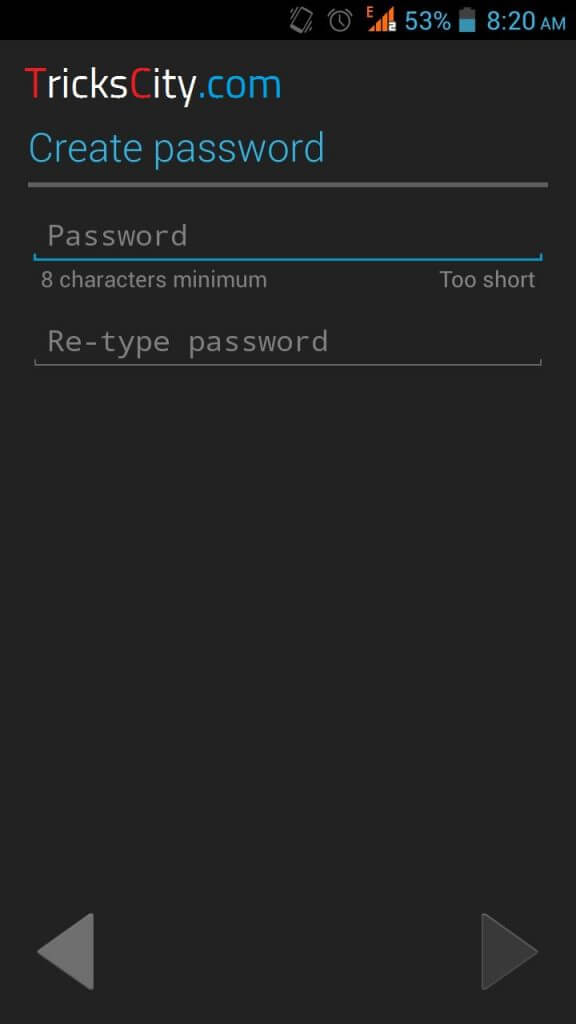
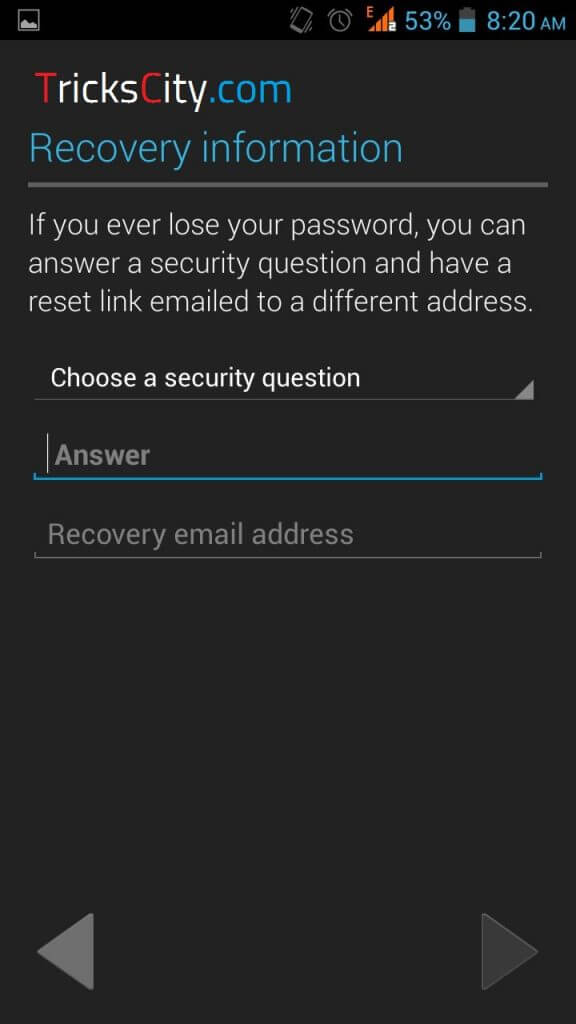
2) After removing all logged in Google accounts, again open Settings >> Accounts >> Google and this time click on New button to make new Google account. Create Google account without phone number3) Enter your First name, Last name and all the details which it asks to enter. Create Gmail account without phone number4) Select Username for new Gmail account and tap on next sign. Create gmail account without mobile number5) Now, Create password and confirm it by entering once again. Make Gmail account without using mobile number verification6) Next step is to Choose a security question.
It will ask to select any Security Question and alternate Email address
for recovery. So just enter Answer for your security question and email
address for further recovery issues.
Make Gmail account without OTP verification7) Enter verification Captcha and tap on next button. Create Gmail account without verification8)
Done, Now your new Gmail account is ready without any phone number
verification. You can use that newly created Google account for any
purpose.
Video Tutorial: How to Create Google Account Without Phone Number/OTP Verification
So this
is the method to create Gmail account without phone number verification.
You can create more unlimited Gmail accounts by repeating above
described steps again and again. Follow same procedure and make
unlimited Google accounts without mobile number verification.Must Read:-How To Bypass OTP Verification On Any Website
How To Create Many Gmail Accounts With Same Mobile Number
In
above section, I described how to create Gmail account without phone
number verification. Now, I am sharing trick to create unlimited Gmail
accounts with same mobile number. You don’t need different phone numbers
for creating more than one Gmail account. Just follow my method and use
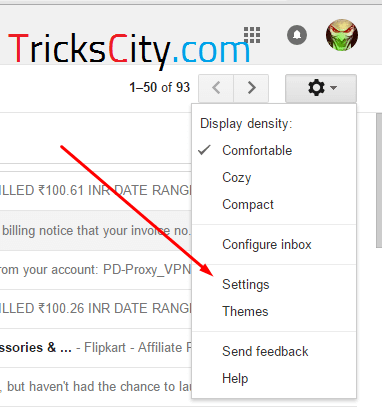
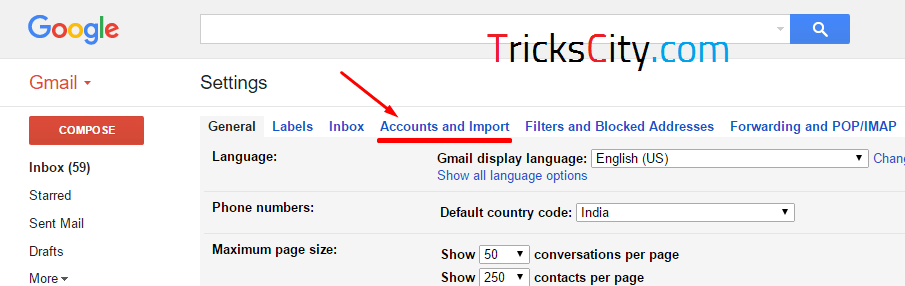
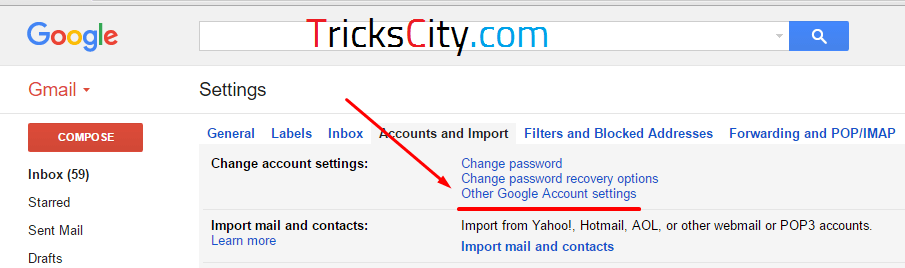
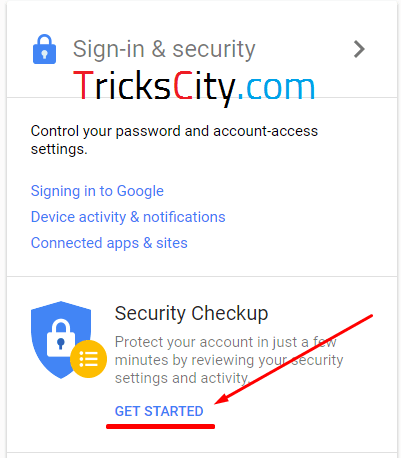
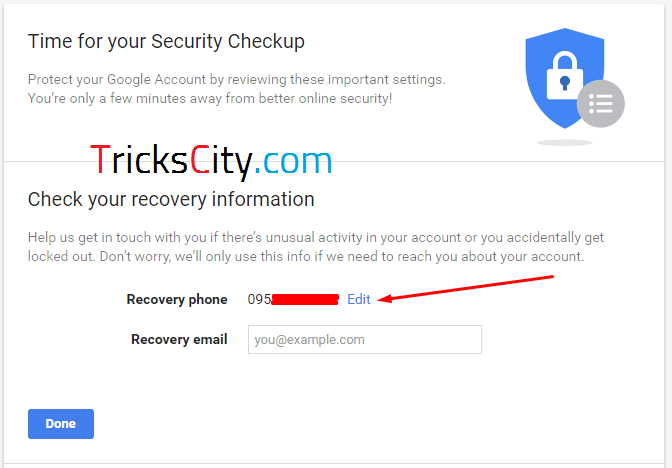
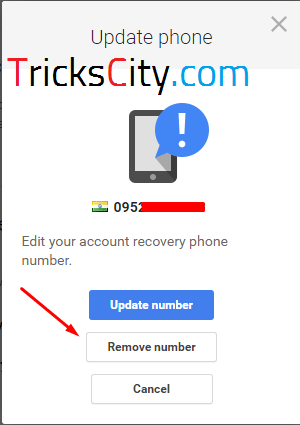
same phone number again and again for OTP verification on Gmail. 1) First of all Login to your old Gmail account in your PC browser. 2) After successfully logging in, click on Settings icon and choose Settings option from top right corner. Create Gmail Account Without Phone Number3) Now, select Accounts and Import option from settings list. Make Gmail Account Without Phone Number4) After clicking on Accounts and Import, click on Other Google Account settings option. (Screenshot given below) Create unlimited Gmail account with same number5) Scroll down and you will see option of GET STARTED in Sign-in & security tab. Make more than one Gmail account with same number6) It will ask to enter your Gmail password again, so just enter password and click on Sign in. 7) Now, it will show your Recovery phone number which you entered while creating that Gmail account. 8) Click on Edit option located in front of your phone number like screenshot given below. how to create Gmail account without mobile number9) Now, just click on Remove number
option from options to remove that number from your account. After
clicking on Remove button your number is successfully unregistered from
Google. Create account without phone number verification on GmailVoila!!
Your phone number is unregistered from Google. Now, you can use that
mobile number in creating new Gmail account without any issue related to
“This number is already registered” or anything. After creating that
new account again follow all the steps from 1 to 9 and use same phone
number for unlimited times and make Gmail accounts as much you want with
same number.
Having a reliable backup of your WordPress site is incredibly important
if you don’t want to lose all your online work. In this post, we’ll
cover some WordPress backup basics and how to backup a WordPress site in
five simple steps.
WordPress Backup Basics
Before we begin, it’s important to cover some WordPress backup basics.
WordPress doesn’t have a built-in backup system.
By default, the WordPress software running your website doesn’t have a
built-in backup system. So, it’s important to take the necessary steps
to make sure you have a WordPress backup strategy in place.
Quite simply: If you don’t have a recent backup and your site is
hacked or your server crashes, you could be facing a complete and total
loss of your WordPress website.
You basically have three options when it comes to WordPress backups:
Rely on your web host (or service provided by your web host) to backup your WordPress site
Perform a manual backup by downloading all WordPress files from your
server – see instructions here from the WordPress codex for backing up your WordPress site.
In the chart below, we outline some of the most important features of
a WordPress backup solution and how each option shapes up.
WordPress Backup Plugin (BackupBuddy)
Backup Service through Web Host
Manual Backup
Automatic, Scheduled Backups
(check with host to confirm frequency)
✘ (manual process)
Backup All Files + Database
(check with host to confirm Media Files + all files in site directory are included)
Fast & Easy Restores
(check with host to confirm)
✘
Database Rollbacks
(check with host to confirm)
✘
Migration (Move to New Host or Domain)
✘ (usually requires support tech)
✘ (requires additional steps)
Downloadable Backup Zip Files
(check with host to confirm)
✘ (files won’t be zipped by default)
Off-site Storage of Backup Files
(includes multiple options)
(check with host to confirm storage location)
✘ (you’ll have to set this up on your own)
Performance Relies on Quality of Host
(Some shared hosting plans limit server resources, loopbacks, etc.)
Why Use a WordPress Backup Plugin Like BackupBuddy?
Since host backup quality varies widely and manual backups are far
too time-consuming, we recommend using a WordPress backup plugin to
backup your WordPress site. Using a backup plugin will save you time,
ensure you own your backup files and site data, and allow you to easily
restore (or move) your WordPress site.
Our recommendation: Use BackupBuddy to save time and automate backups.
As explained in the chart above, running a backup plugin to handle
backups for you has several advantages. One important component of a
successful backup strategy is the ability to set up scheduled, automatic WordPress backups.
Not sure if BackupBuddy is right for you? Check out this guide for finding the best WordPress backup plugin.
BackupBuddy includes a ton of backup scheduling options that most
backup services provided by your host don’t actually offer, including
yearly, twice yearly, every three months, once monthly, twice monthly,
once weekly, twice weekly, every other day, once daily, twice daily and
once hourly. If you are using a backup solution through your host,
confirm their backup scheduling options can run to match how frequently
your site is updated.
Another advantage of using a plugin is that you actually own your
backup files and data. With a plugin like BackupBuddy, you can download
your backup zip files to your computer or store them in a secure,
off-site storage destination of your choosing. You don’t have to request
a zip file from a service, wait on file delivery, or get stuck with an
incomplete backup.
BackupBuddy also handles restoring your WordPress site if something goes wrong. A WordPress backup and restore feature is the second component of a complete WordPress backup solution. What good is a backup if you can’t do anything with it?
Last, BackupBuddy also allows you to move your WordPress site to a
new host or domain. Owning your website files means not being locked
into a poor web host. BackupBuddy’s WordPress migration feature makes it possible to easily change hosts, servers or your WordPress site’s domain name.
How to Backup a WordPress Site: 5 Simple Steps
1. Follow the normal WordPress plugin installation methods to
install and activate the BackupBuddy plugin on your WordPress site.
Complete the Quick Setup Wizard to fill out some necessary backup settings.
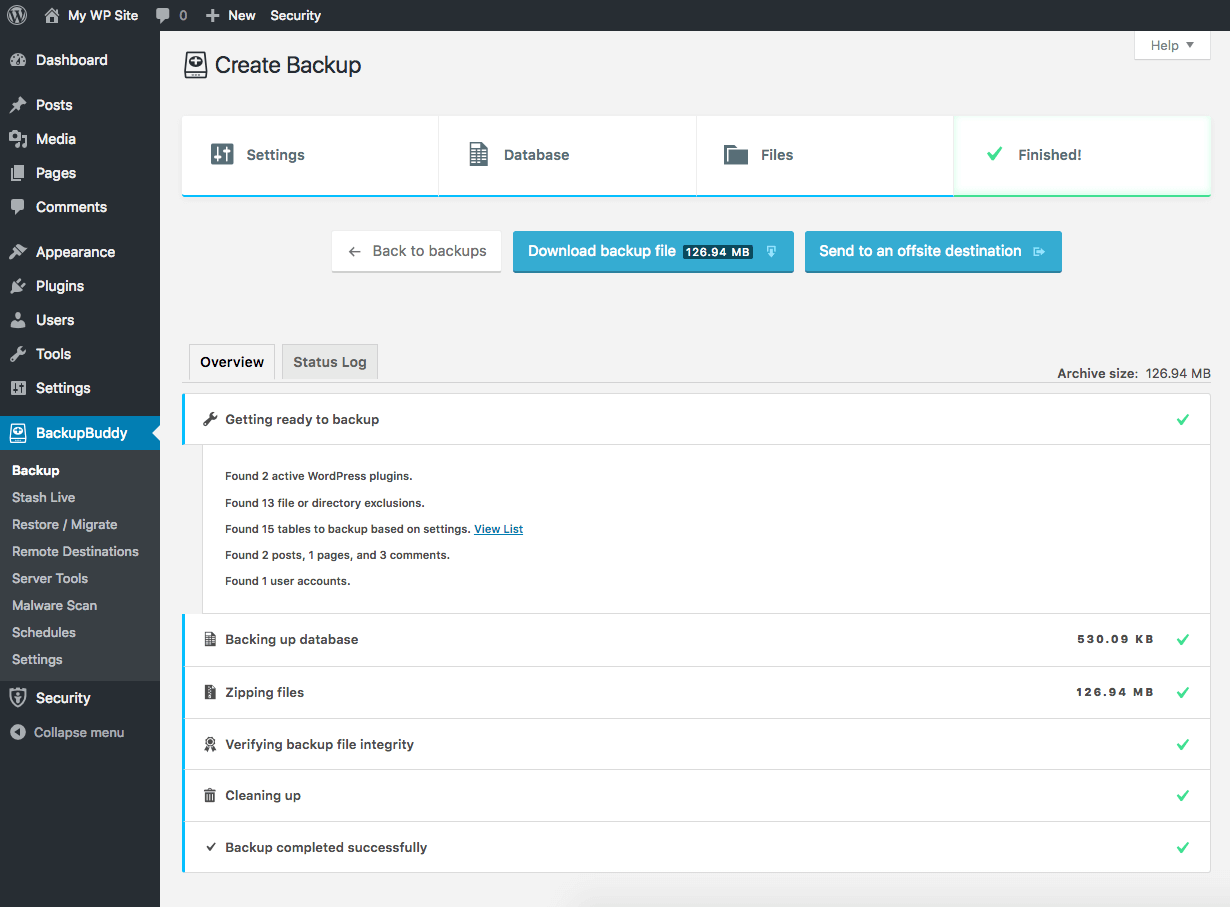
2. Run a complete backup of your WordPress site. Download the zip file of your WordPress site backup.
Navigate to the BackupBuddy > Backups page and click the (Full)
Complete Backup button. BackupBuddy will go to work backing up your
WordPress site’s database and files, zipping up the files and verifying
the backup integrity.
You can download your backup zip file immediately here by clicking the “Download backup file” button.
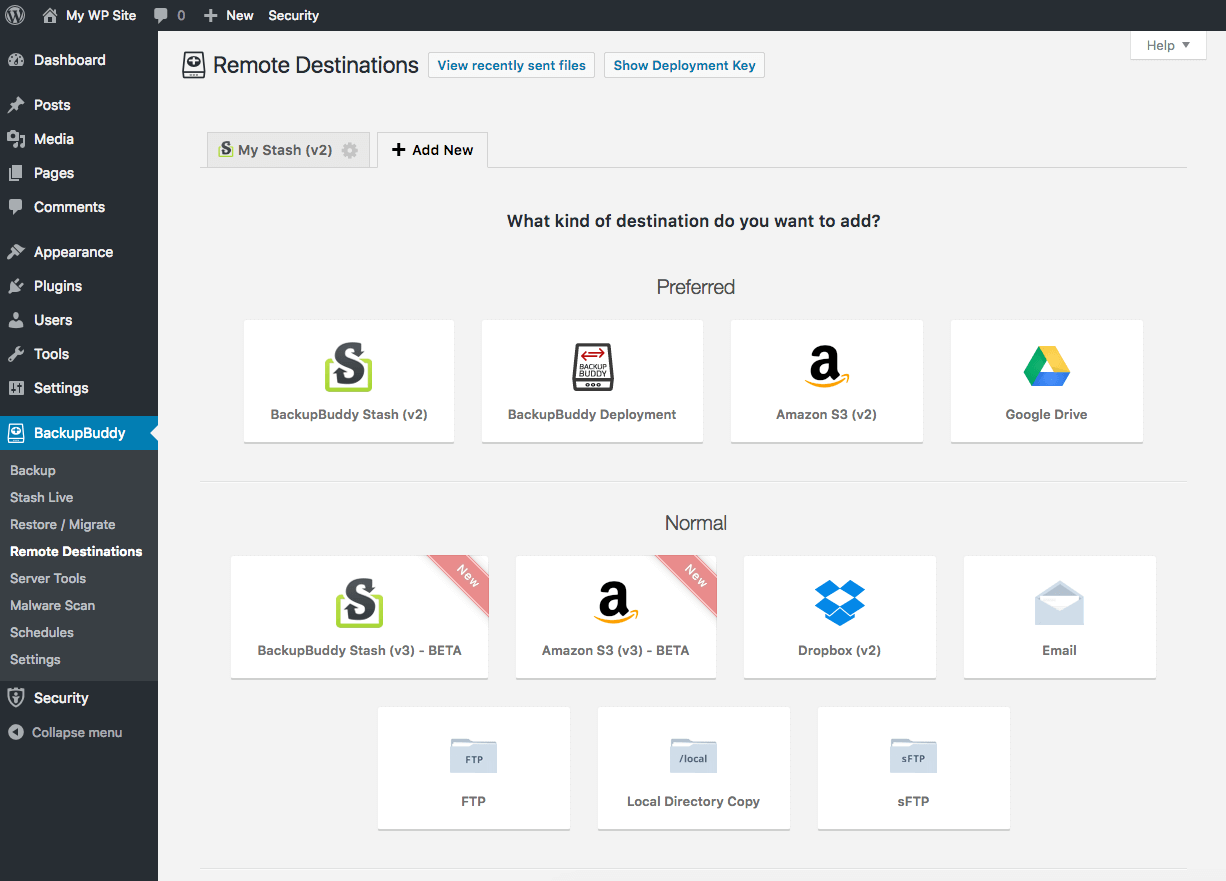
3. Set up Remote Destinations to store your WordPress Backups.
Your backup files should be stored safely off-site in a secure,
remote storage location. From the BackupBuddy > Remote Destinations
page, you con configure your Remote Destinations settings here.
BackupBuddy supports several remote destinations, including WordPress backup to Dropbox and WordPress backup to Google Drive.
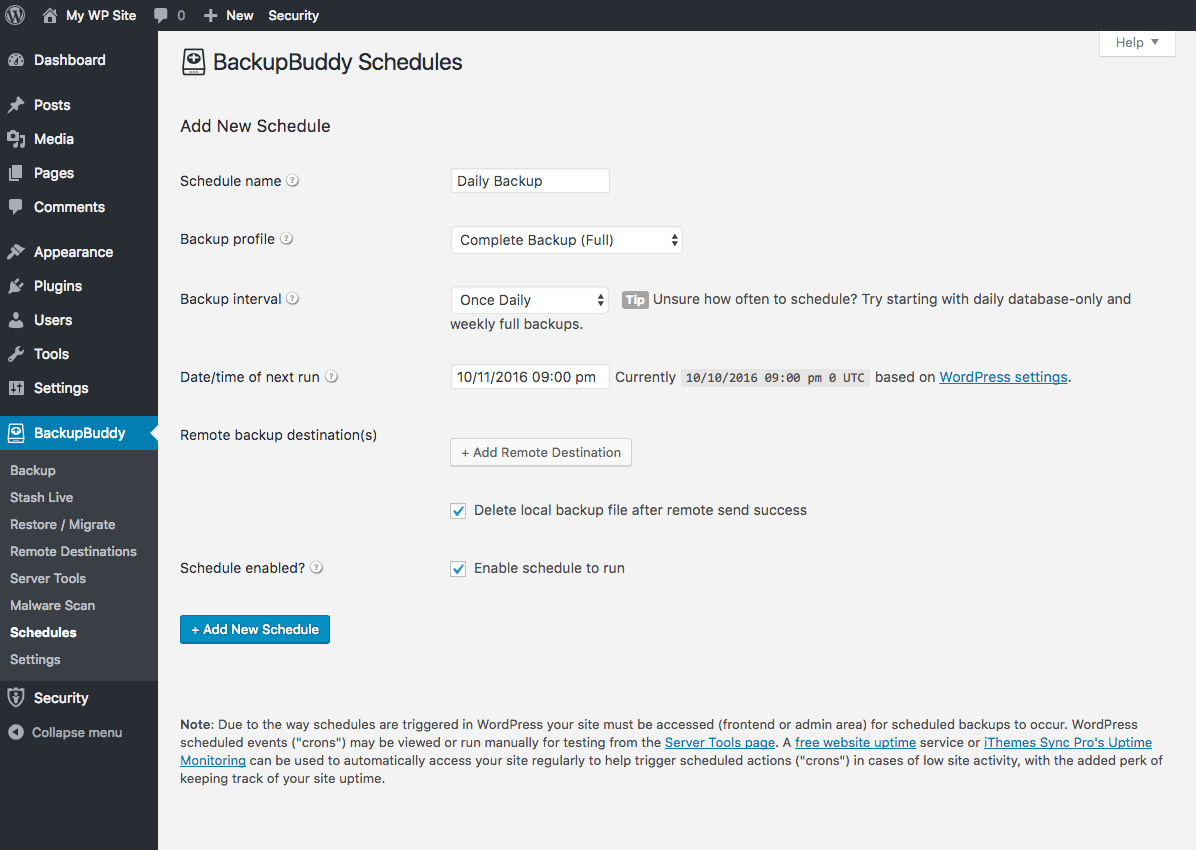
4. Set up Backup Schedules so backups run automatically.
The next important step is to make sure WordPress backup schedules
are set up and running. Setting up these schedules means you don’t have
to manually run backups; BackupBuddy will just handle your WordPress
backups automatically for you.
Visit the BackupBuddy > Schedules page to configure your settings.
From here, you can select backup intervals and where to deliver backups
once they complete.
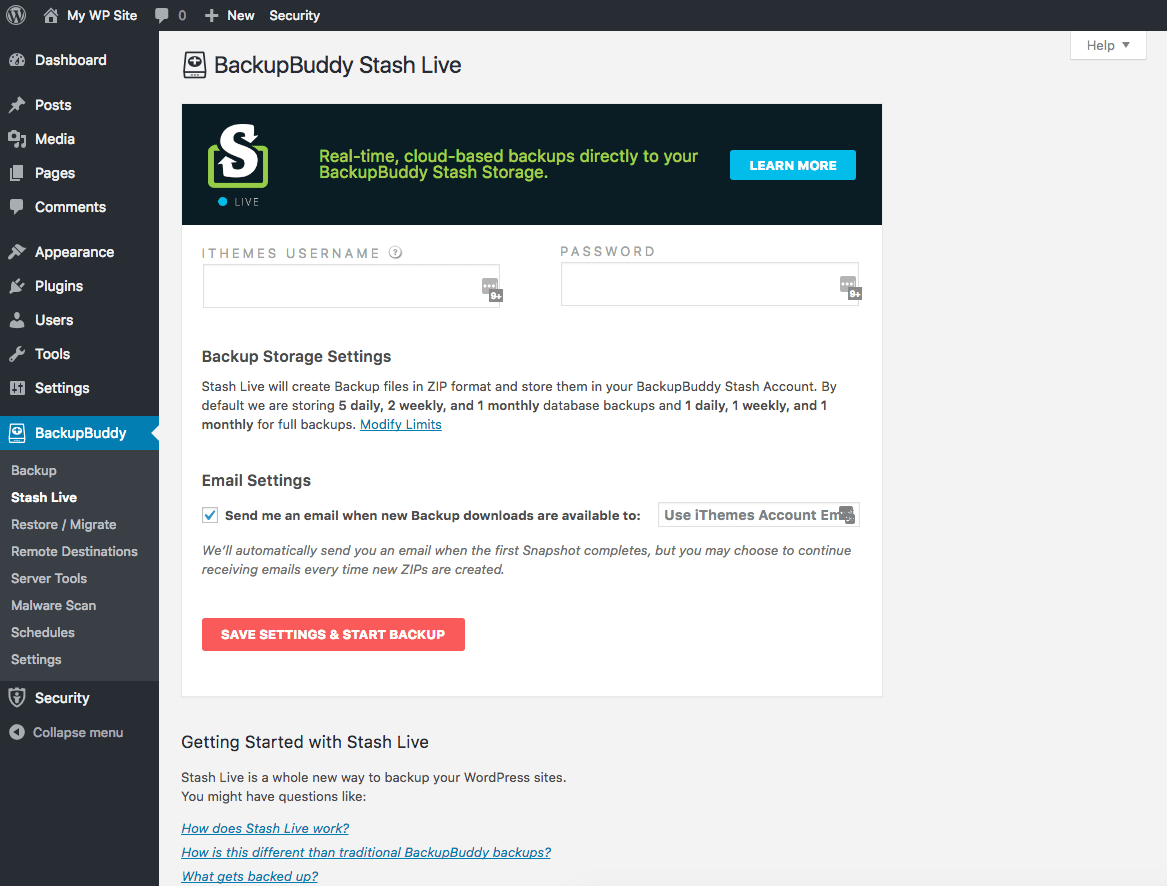
5. Enable Stash Live for real-time, cloud-based backups.
BackupBuddy 7.0 introduced a new cloud-based, real-time WordPress backup
system. All BackupBuddy users get 1GB of free backup storage space, so
enable Stash Live to take advantage of this redundant backup. One of the
key features of Stash Live is how it makes realtime backups of changes
as they happen. Stash Live also works well even if your host has limited
your server resources.
From the BackupBuddy menu, visit the Stash Live page. Enter your
iThemes username and password and Stash Live will go to work building a
complete snapshot of your WordPress site.
People are bit confused while providing their contact information with
Unique Identification Authority of India (UIDAI) for your Aadhaar Card.
Many times people come into dilemma whether the information given while
applying to Aadhar Card is correct or not.
Techiyogiz here comes up useful information on how to verify Phone
Number of your Aadhar Card by heading to UIDAI official website. Aadhar
Card is the mosit important identification of a person which is being
taken into consideration by Government of India and also made mandatory.
Linking Aadhar Card with PAN Card is also mandatory for filling income
tax returns and the important of it has been increased all these years.
Here is the online tool of UIDAI to instantly verify contact information
of the person or check whether it is right or wrong.
People should go to home page of UIDAI official website to verify once Aadhaar Card's contact number.
1. Go to Verify Email/Mobile Number under Aadhaar Services tab
2. New Tab opens - Enter details like your Aadhaar Number, email Address, Mobile Number
3. Type Security Code to head further
Verify Contact Number on UIDAI Website :
1. Enter Mobile Number Verify Email/Mobile Number tab
2. You will receive an OTP on the registered Mobile Number
3. Verify It
4. Congratulations! The Mobile Number matches with our records!
Verify email address on UIDAI Website :
1. On UIDAI platform enter Aadhaar number, email address, and a security code
2. You will receive an OTP to the email address
3. Verify it
4. Congratulations! The Email ID matches with our records!
Final Note :
Every piece of information provided by you at the time of Aadhar Card
verification to UIDAI should be authentic and any wrong details might
proceed to problems at very important times. Every detail should be
right in terms of Aadhar Card as it is most important proof of identification.
आज का हमारा यह आर्टिकल उन सिंगल लड़कियों के दिमाग की खिड़की है जिसके
अंदर झांक कर आप अपने इन सवालों के जवाब आसानी से पा सकते हैं। आइए जानते
हैं कि आखिर सिंगल लड़कियां क्या सोचती हैं जब वो किसी कपल को अपने आस-पास
बैठा देखती हैं।
किसी कपल को रोमांस करते या साथ चलते देख सिंगल लड़कियों को सबसे पहले अपने
अधूरेपन का अहसास होता है। ऐसे कपल्स को देखकर लड़कियां सोचती हैं कि वो
अपनी जिंदगी में कितनी अधूरी हैं।
पब्लिक प्लेस पर कपल्स को देखकर सिंगल लड़कियों को अपनी जिंदगी में प्यार
की कमी का अहसास होता है। इतना ही नहीं ऐसे में लड़कियां सोचती हैं कि काश
उनकी जिंदगी में भी कोई इतना चाहनेवाला होता...
कपल्स को साथ देखकर सिंगल लड़की के दिल में ख्याल आता है कि काश मेरे पास
भी ऐसा एक बॉयफ्रेंड होता या फिर लड़कियां सोचती हैं कि इस लड़की को इतना
हैंडसम बॉयफ्रेंड कैसे मिल गया, मैं तो इससे कही ज्यादा खूबसूरत हूं।
जब भी कोई सिंगल लड़की किसी कपल को पब्लिक प्लेस पर किस करते देख लेती हैं
तो उनके मन में ये ख्याल आता है कि कैसे कपल हैं ये जो कहीं भी शुरू हो
जाते हैं। इन्हें रोमांस करने के लिए कोई और जगह नहीं मिली क्या।
कुछ सिंगल लड़कियां ऐसी भी होती हैं जो सोचती हैं कि बॉयफ्रेंड बनाने से
ज्यादा अच्छा है एक कुत्ता पाल लेना। खासकर कपल्स को देखकर कुछ सिंगल
लड़कियां ये सोचती हैं कि लड़कों से ज्यादा वफादार तो कुत्ते होते हैं।
इसलिए बॉयफ्रेंड की जगह एक कुत्ता ही पाल लेना बेहतर है।
आमतौर पर कपल्स को देखने के बाद सिंगल लड़कियों के दिल में जलन की भावना
तेज हो जाती है। इस जलन के पीछे सिर्फ एक ही वजह होती हैं कि उनकी जिंदगी
में मिस्टर परफेक्ट नहीं है। लेकिन जो लड़कियां पहले रिलेशनशिप में रह चुकी
हैं उन्हें ऐसे कपल्स को देखकर ज्यादा जलन होती है।
जब भी कोई सिंगल लड़की कपल्स को प्यार भरी बातें करते हुए देखती हैं तो
उनके मन में ये ख्याल भी आता है कि आज ये कपल्स एक-दूसरे से इतना प्यार जता
रहे हैं कल यही झगड़ा करेंगे और एक-दूसरे से दूर जाने के बहाने ढूंढेंगे।
आमतौर पर सिंगल लड़कियां कपल्स को देखकर ये सब बातें सोचती हैं क्योंकि
कहीं ना कहीं वो खुद को अकेला महसूस करती हैं और उनके इस अकेलेपन का अहसास
तब और बढ जाता है जब वो कपल्स को साथ देखती हैं।
आजकल 30 साल की उम्र के बाद शादी करने का ट्रेंड बनता जा रहा है। लोग पहले
करियर और घर-बार के बारे में सोचते हैं फिर सब कुछ सेटल हो जाने के बाद
शादी के बारे में सोचते हैं। ऐसे में कभी-कभी उम्र 35 या 40 तक भी पहुंच
जाती है। लोगों में ये धारणा बनती जा रही है कि शादी के लिए सही उम्र 30
साल के बाद है। लेकिन आज हम आपको बतायेंगे कि शादी की सही उम्र पर क्या
कहता है साइंस
सही जीवन साथी चुनना बहुत मुश्किल काम है,
और ये उस वक्त और मुश्किल हो जाता है जब उम्र ज्यादा हो जाए। यूको
विश्वविद्यालय में प्रोफेसर निकोलस एच. वोल्फिंगर द्वारा किए गए एक अध्ययन
के मुताबिक जो लोग 20 से 30 वर्ष की आयु के बीच शादी कर लेते हैं, उनका
तलाक होने की कम संभावनाएं होती हैं।
रिसर्च के मुताबिक, जिन लोगों कि शादी 20
के बाद और 30 से पहले हुई है उनके बीच तलाक के मामलों में कमी आई हैं। तलाक
की संभावना तब बढ़ जाती है जब आप 30 से 40 के बीच में शादी करते हैं।
वोल्फगेर लिखते हैं, “32 साल की उम्र में शादी होने पर शादी में प्रति वर्ष
5% तक तलाक की संभावना बढ़ जाती हैं।”
वोल्फगेर आगे लिखते हैं, “ऐसे लोग जो शादी
के लिए 30 साल तक इंतजार करते हैं, वे लोग अक्सर अपने शादी के बंधन को ठीक
से नही निभा पाते हैं।” हालांकि, इंस्टीट्यूट ऑफ फैमिली स्टडीज द्वारा
प्रकाशित इस अध्ययन में ये भी बताता गया है कि 30 साल से अधिक उम्र में
शादी करने वाले लोग 20 से 30 साल की उम्र में शादी करने वाले लोगों की
तुलना में अधिक परिपक्व होते हैं और आम तौर पर आर्थिक दृष्टि से संपन्न
होते हैं।
वोल्फिंगर कहते हैं, “जो लोग 30 के बाद
शादी करते हैं, उन्हें अपनी पत्नी के साथ अपने विवाह को सफल बनाने के लिए
तरह-तरह के तरीके अपनाते पड़ते हैं।” 30 से पहले शादी करने का फायदाे ये
हैं कि जल्दी शादी होने से शादीशुदा जिंदगी को एंजॉय करने का काफी समय
मिलता है और करियर संबंधी और फैमिली की जिम्मेदारी कम उठानी पड़ती है।
Agar aap kisi ladki ko chahte ho dil se to bas yeh tham lo ki aap
usse sabse pehle acchi friendship karle, Kyunki agar ladki ne propose ka
reply naa me diya fir bhi aap uske sath reh sakte hai aur dobara uska
dil jit kar usko propose kar sakte hai aur vo aap se baat bhi karti
rahegi.
Ladke ya ladkiyon me propose karna bohot difficult lagta hai kyun ki
aap darte hai ki samne wala bura man gaya to us ne aap ki baizatti ki to
ya ladke ladkiyon ke samne kahi aapko chata na mar de.
Magar isne dar ne wali koi baat nahi hai, Agar ap kisi ladki ko
chahte ho to ladki ko propose karne me dikkat nahi hai kyun ki aap dono
ke sath rehkar ek dusre ka sath nibhane ke bareme hi sochte hai, aap koi
galat kaam nahi kar rahe hai.
Ladkiyo Ko Patane Ke Formulas :
Ladki se baat karne ka dhunde bahana.
Ladki ke contact me rehne ki koshish kare.
ladki ko patane ke liye uske sath friendship karlo.
ladki ke sath acchi tarah se baat kare.
Sabhyata dikhaye.
Acche kapde pehne.
Soft Deo use kare jab ladki ko milne jaoge tab.
Ladki ke zaroorato ko jaane.
Ladki ka pasandida colour jaan kar vaise kapde pehne.
Ladki ko uske birthday ke din accha sa tofa de.
Aap ladki ko chahte hai to kyun dara jaye ladki ko propose karne me.Aap
usse kitna chahte uska ehsas ladki ko dilaye uske karan ladki emotional
ho jayegi. Aur aap ko propose karne ke baad haa bhi kar degi aur aapka
propose bhi accept kar legi.
Kai ladke ladkiya sochte hai ki samne wala propose karega pehle tab hi
bat hogi, Dosto aisa nahi hai har ladki ka sapna hota hai ki koi ladka
uski taraf dekhe aur vo ladka khud us ladki ko propose karne aaye, agar
ladki bhi aap par marti hai to vo thoda hichkichayegi ki kaise kare
propose aapko. To aap khud ladki ke pas jakar ladki ko dil ki bat khud
kare,Iske karan ap ka intzaar bhi khatam ho jayega vo apke pas ajayegi.
Agar aap se ladki pat gayi hai aur ladki ne apka propose accept kar
liya hai to aap ladki ke sath date par jaoge to sexually jyada pas mat
aao. Ladka aur ladki dono excite rehte hai kiss karne ke liye to aap ladki ko kiss kaise kare
yeh pehle dhyan se seekh le. Aap dono ka first kiss ek romanch kari
hona chahiye. Kiss karne se ladki apke sath dil se jyada connect ho jati
hai............
घर में शांति चाहिए तो आपको शाम के समय नहीं सोना चाहिए। रात में सोने से पहले अपने इष्ट देव का स्मरण जरुर करें।
घर के मध्य भाग में जूठे बर्तन साफ करने का स्थान नहीं बनाना चाहिए।
रोज सुबह नहा धोकर एक तांबे के बर्तन में ताजा जल उसमें तुलसी के पत्ते
डालकर भगवान विष्णु की मूर्ति के पास रखें और घर में सुख शांति के लिए
मंत्र ११ बार ‘ओम नमो भगवते वासुदेवाय’ घर में सुख शांति के लिए मंत्र का जाप करें फिर वह जल पूरे परिवार को पीने के लिए दे।
घर मे कभी झाड़ू को खड़ा करके ना रखें और उसे पैर ना लगाए। नाहीं झाड़ू के ऊपर से गुजर अन्यथा घर में बरकत की कमी हो जाती है।
घर में बरकत चाहिए तो हमेशा सुबह की पहली रोटी गाय को खिलाएं।
मंदिर में धूप, अगरबत्ती व हवन कुंड की सामग्री दक्षिण पूर्व में रखे।
घर के मुख्य द्वार पर दाई तरफ स्वस्तिक बनाए।
घर में कभी भी मकड़ी के जाले में लगने ना दे वरना घर में राहु का असर होगा।
घर में जूते चप्पल इधर-उधर बिखेरकर या उलटे सीधे करके नहीं रखने चाहिए इसके घर में अशांति उत्पन्न होती है।
बिस्तर पर बैठकर कभी खाना ना खाए ऐसा करने से बुरे सपने आते हैं।
घर में बरकत चाहिए तो सुबह जल्दी उठकर पूजा पाठ करें।
रोज सुबह अपने घर के मटके में जिसका आप पानी पीते हैं या उसमें पानी रखते हैं उसमें गंगाजल की कुछ बूंदे डाले।
घर में पूजा के स्थान पर एक अखंड ज्योत लगाएं और उसे बिल्कुल भी न बुझने दे और समय-समय पर ही तथा बाती डालते रहे।
रोज अपने मस्तक पर केसर चंदन का तिलक लगाकर ही घर से बाहर निकले।
दरवाजा खोलते तथा बंद करते समय सावधानी बरती की कर्कश आवाज ना हो। इससे
घर में कलह होता है। इससे बचने के लिए दरवाजे पर स्टॉप पर लगाएं।
रोटी बनाते समय पहली रोटी अग्निदेव को अर्पित करें या गाय को खिलाएं धनागमन के स्त्रोत बढ़ेंगे।
कहीं जाने के लिए घर से रात्रि या दिन के ठीक 12:00 बजे ना निकले।
भोजन यथासंभव अग्नि कोण में पूर्व की ओर मुंह कर पकाना और पूर्व की ओर मुंह करके खाना चाहिए।
पूजाघर पूर्वोत्तर में होना चाहिए तथा पूजा यथासंभव सुबह 6:00 से 8:00
के बीच भूमि पर ऊनी आसन पर पूर्वोत्तर की ओर मुंह कर बैठक कर ही करनी
चाहिए।
ईशान कोण में सदैव जल का एक कलश भरकर रखना चाहिए इससे घर में संपन्नता आती है मकान के पूर्वोत्तर कोने को हमेशा खाली रखना चाहिए।
घर में कहीं भी झाड़ू को खड़ा करके नहीं रखना चाहिए। उसे पैर नहीं
लगाना चाहिए, ना ही लांघा जाना चाहिए। अन्यथा घर में बरकत और धन आगमन के
स्त्रोतों में वृद्धि नहीं होती।
घर में दरवाजे अपने आप खुलने व बंद होने वाले नहीं होनी चाहिए ऐसे दरवाजे अज्ञात भय पैदा करते हैं।
खिड़कियां खोल कर रखें ताकि घर में रोशनी आती रहे।
किसी महत्वपूर्ण काम के लिए दही खाकर या मछली का दर्शन कर घर से निकले।
घर के चारों ओर गंगा जल छिड़के। इससे घर पवित्र होता है।
घर में मकड़ी का जाल नहीं लगने दे अन्यथा धन की हानि होती है।
घर में या घर के बाहर नाली में पानी जमा नहीं रहने दे।
सिढीयो की शुरूआत त्रिकोणीय आकार में नहीं होनी चाहिए।
मकान की सीढ़ियां पूर्व से पश्चिम या उत्तर से दक्षिण की ओर पश्चिम या उत्तर से दक्षिण की ओर जाने वाली होनी चाहिए।
सीढीयो के दोनों और रेलिंग बनी होनी चाहिए।
जब सीडीया पहली मंजिल की ओर निकलती हो तो हमारा मुख उत्तर-पश्चिम यह दक्षिण पूर्व में होना चाहिए।
घर की सीढ़ियों के आरंभिक एवं अंतर द्वार अवश्य बनाना चाहिए।
घर की सीढ़ियों का द्वार पूर्व अथवा दक्षिण दिशा में होना चाहिए।
घर की सीढ़ियों के लिए भवन के पश्चिम, दक्षिण या नैऋत्य का क्षेत्र सर्वाधिक उपयुक्त होता है।
घर के आग्नेय कोण अर्थात दक्षिण पूर्व में सीढ़िया बनवाने से संतान के स्वास्थ्य पर बुरा प्रभाव पड़ता है।
सीढ़िया कभी भी उत्तरी या पूर्वी दीवार से जुड़ी हुई नहीं होनी चाहिए।
उत्तरी या पूर्वी दीवार एवं सीड़ियों के बीच कम से कम 3 फूट की दूरी अवश्य
होनी चाहिए।
घर के उत्तर पूर्व या ईशान्य कोण में सीढ़िया बनवाने नहीं चाहिए। इस
क्षेत्र में सीढ़िया बनवाने से आर्थिक समस्याओं का सामना करना पड़ता है।
व्यवसाय में नुकसान होता है। तथा स्वस्थ की हानि भी होती है। और ग्रह
स्वामी के दिवालिया होने की संभावना भी होती है।
अगर घर बनाते समय आप वास्तु शास्त्र के अनुसार सीढ़िया नहीं बनाते हो और
आपको परेशानियों का सामना करना पड़ रहा हो तो नीचे दिया गया उपाय करें-
घर बनाते समय सीढ़ियों के संबंधित कोई वास्तु दोष रह गया है तो उस स्थान
पर बारिश का पानी मिट्टी के कलश में भरकर तथा मिट्टी के ढक्कन से ढककर
जमीन के नीचे दबा दें। ऐसा करने से सीडीओ के संबंधी वास्तु दोषों का नाश
होता है।
केले कोभारत में इसे बहुत महत्व दिया जाता है. जहां विभिन्न क्षेत्रीय व्यंजनों
में इसे मिठाई बनाने में इस्तेमाल होता है तो कई कच्चे केले की सब्जी बनाई
जाती है. अमेरिका में केले के चिप्स सबसे ज्यादा लोकप्रिय
है. भारत की कई जगह पर तो केले के पेड़ की पूजा भी की जाती है. लेकिन क्या
आप जानते है केला सिर्फ एक फल न होकर एक प्राकर्तिक औषधि भी है. आजकल
स्पोर्ट्स ड्रिंक्स, एनर्जी बार्स और इलेक्ट्रोलाइट जैल काफी
फेमस हैं लेकिन फिर भी आपने खेलो विशेषकर टेनिस के दौरान खिलाडियों को
केले खाते हुए देखा होगा । जानते है क्यों?? क्योकि केले की सबसे बड़ी
क्वालिटी है इसमें मौजूद इंस्टेंट एनर्जी जो हमें पूरा दिन एक्टिव रखने में
मदद करती है. तो चलिए जानते है केला हमारे शरीर के लिए किस तरह उपयोगी
है...
केले में हाई फाइबर होता है. हाई फाइबर फ़ूड दिल के लिए अच्छे माने
जाते है. यूके के लीड्स विश्वविद्यालय द्वारा किए गए एक अध्ययन के
मुताबिक केले जैसे फाइबर युक्त पदार्थों को खाने से कार्डियोवैस्कुलर रोग
(सीवीडी) और कोरोनरी हार्ट रोग (सीएचडी) दोनों का खतरा कम होता है।
आयुर्वेद के अनुसार केला अग्नि (पाचन रस) बढ़ाने में मदद करता है, जिससे
पाचन क्रिया और metabolism में सुधार होता है. रोजाना 2 केले खाने से कब्ज से छुटकारा मिलता है.
केला Nutrition से भरपूर होता है. कई आवश्यक विटामिन और खनिज जैसे
पोटेशियम, कैल्शियम, मैंगनीज, मैग्नीशियम, लोहा, फोलेट, नियासिन,
रिबोफोलाविन और विटामिन बी 6 केले में होते है। ये सभी शरीर के proper
functioning में योगदान करते हैं और आपको स्वस्थ रखते हैं.
केले में पोटेशियम की हाई क्वांटिटी इसे एक सुपर फ्रूट बनाती है।
पोटेशियम अपने कई स्वास्थ्य लाभ गुणों के लिए जाना जाता है. यह दिल की
धड़कन, रक्तचाप को नियंत्रित करने और मस्तिष्क के स्वास्थ्य को बनाए रखने
में मदद करता है। पोटैशियम हमारे किडनी और हड्डियों को भी लाभ देता है..
केले में आयरन होने के कारण ये एनीमिया से पीड़ित लोगों के लिए
अच्छा माना हैं। एनीमिया एक ऐसी स्थिति है जहां रक्त में लाल रक्त कोशिकाओं
या हीमोग्लोबिन की संख्या में कमी आ जाती है। इससे थकान और सांस की तकलीफ
बढ़ जाती है।
यहां तक कि केला हमारा स्किन के लिए भी अच्छा माना जाता है .छाले और
मुँहासे जैसी स्किन प्रोब्लेमस के इलाज के लिए केला बहुत लाभकारी
है. । केले में मौजूद फैटी एसिड स्किन की कई समस्याओ से छुटकारा देने में
मदद करता है.
केले अमीनो एसिड ट्रिप्टोफैन का एक अच्छा स्रोत है जिसे हमारा शरीर सेरोटोनिन नमक केमिकल में बदलता है। सेरोटोनिन का प्रॉपर लेवल हमारे मूड को सुधारने, तनाव को कम करने और खुशी के स्तर को बढ़ाने में मदद करता है। यह हमारी नींद के पैटर्न को भी कण्ट्रोल करता है...
केले के ये सभी फायदे रिसर्च पर आधारित है. उम्मीद करते है केले के गुण
जानने के बाद जो लोग केले का taste पसंद नहीं करते है वे भी इसे खाना शुरू
करेंगे.
शरीर की दुर्गन्ध से बचने के लिए 5 से 6 टमाटरो का जूस पानी में डाल कर
उससे स्नान कर ले, इसके एंटीसेप्टिक गुण शरीर से आने वाली दुर्गन्ध को दूर
करते है और यह त्वचा के छिद्रो को भी छोटा करते है जिनसे पसीना बाहर निकलता
है, इससे कम पसीना बाहर निकलता है.
(2) बेकिंग सोडा :
जिन जगहों पर पसीना ज्यादा आये और अपने बाहु के नीचे (underarms) बेकिंग
सोडा लगाये बेकिंग सोडा बैक्टीरिया को मारता है और प्राकर्तिक डीओडोरेंट
(deodorant) से कम नहीं या आप शलजम का जूस निकालकर भी लगा सकते है, जिससे
प्राकर्तिक रूप से पसीने को सुखाने में मदद मिलेगी. इससे कई घंटो तक आपको
पसीने की बदबू से छुटकारा मिलेगा. पसीने की बदबू को दूर करने के लिए शलजम
का जूस पिया भी जा सकता है. शलजम में मौजूद विटामिन सी बैक्टीरिया को बढ़ने
से रोकता है, जिससे पसीने की दुर्गन्ध से राहत मिलती है.
(3) सिरका :
नहाने के बाद दो चम्मच सिरका या सेब का सिरका एक लोटे पानी में डाले और
फिर इसे अपनी बगल में और जिन जगहों पर पसीना बहुत आये उन जगहों पर इसे धो
कर साफ कर ले, ये एक प्रभावकारी घरेलू नुस्खा है.
(4) डीओडोरेंट :
डीओडोरेंट (deodorant) बैक्टीरिया से पैदा होने वाली दुर्गन्ध को रोकती
है. यह जरूरी नहीं की यह पसीने को रोके हालाँकि यह पसीने की नमी को रोके
बिना भी शरीर से आने वाली बदबू को रोक सकता है. यह कुछ समय के लिए या
ज्यादा समय के लिए पसीने की बदबू को रोक सकता है, यह इसकी गुणवत्ता पर
निर्भर करता है.
(5) साफ सफाई :
पसीने की बदबू से बचने के लिए अपने आप को साफ़ जरूर रखे. दिन में कम से
कम एक बार जरूर नहाये. जब ज्यादा पसीना आये और इससे शरीर मे बदबू आ रही हो
तो भी स्नान कर लेना चाहिए.
(6) एंटीबैक्टीरियल साबुन :
बैक्टीरिया की वृद्धि को रोकने के लिए किसी ऐसे साबुन का इस्तेमाल भी कर
सकते है जो बैक्टीरिया को मारकर पसीने की दुर्गन्ध से निजात दिला सके.
जितनी देर तक ये बैक्टीरिया शरीर से दूर रहेंगे उतनी देर तक आपके पसीने से
बदबू नहीं आयेगी
(7) शरीर को रखे शुष्क :
शरीर से आने वाली बदबू से बचने के लिए अपने शरीर को शुष्क रखे. नहाने के
बाद उन स्थानों को तौलिये से अच्छी तरह पौंछ ले जहाँ से पसीना ज्यादा
ज्यादा निकलता है. नमी बैक्टीरिया के बढ़ने में अच्छा माहौल तैयार करती है.
इसलिए शरीर को सुखा कर रखे.
(8) खान पान पर रखे ध्यान :
कुछ भोजन पसीने की दुर्गन्ध को ओर बढ़ा देते है, इन भोजन में प्याज,
लहसून, रेड मीट, मसालेदार खाना, करी पाउडर, शराब और कैफीन युक्त पेय शामिल
है. ये भोजन और पेय हमारे अन्दर गर्मी पैदा करते है. इससे काफी पसीना
निकलता है और पसीने से आने वाली बदबू की परेशानी ओर बढ़ जाती है. इसलिए ऐसा
भोजन और पेय खाने पीने से बचना चाहिए.
(9) ज्यादा से ज्यादा पानी पीये :
दिन में करीब 3 लीटर पानी जरूर पीना चाहिए, इससे शरीर का तापमान और पेट
की सेहत अच्छी बनी रहती है. ज्यादा पानी पीने से स्किन हाइड्रेटेड रहेगा,
शरीर से टोक्सिंस बाहर निकलेंगे जिससे शरीर की दुर्गन्ध से लाभ पहुचेगा.
(10) निम्बू का रस :
जिस पानी से आप स्नान करते है उसमे गुलाब जल या निम्बू का रस मिला ले.
निम्बू का रस पसीने की दुर्गन्ध को दूर करता है क्योकि निम्बू में एसिडिक
गुण होते है जो बैक्टीरिया को ख़त्म कर देते है. निम्बू का रस उन हिस्सों पर
रगड़ भी सकते है जहाँ से ज्यादा पसीना निकलता हो जैसे अंडरआर्म्स.
(11) कॉटन के वस्त्र पहने :
कॉटन पसीना सोखता है और कॉटन के वस्त्रो से शरीर को हवा मिलती रहती है, अत: पसीने की दुर्गन्ध से बचने के लिए कॉटन के कपडे पहनने चाहिए. अपने इनरवियर रोज बदले.
(12) जुराब :
अपनी जुराब और कपडे रोज धोये, इन्हें रोज बदले, कॉटन की जुराब पहने,
अपने जूतों को भी साफ़ रखे, जुटे के अन्दर एंटीफंगल स्प्रे का प्रयोग करे.
(13) तुलसी :
तुलसी का प्रयोग भी शरीर की दुर्गन्ध को दूर करने के लिए किया जाता है.
तुलसी की कुछ पत्तियों को कूट कर इसे tea tree oil की कुछ बूंदों में मिला
दे और फिर इसे अपने अंडरआर्म्स में लगाये. कुछ देर लगा कर फिर इसे धो ले.
इसके बाद इसपर साबुन न लगाये. tea tree oil में एंटीबैक्टीरिया और
एंटीसेप्टिक गुण होते है जो बैक्टीरिया को मारते है और पसीने और बदबू को
दूर करते है.
राखी पूरे विश्व में हिंदुओं द्वारा मनाए जाने वाले सबसे महत्वपूर्ण त्योहारों
में से एक है जो श्रावण मास की पूर्णिमा को मनाया जाता है । यह त्योहार भाई
 और बहनों के बीच प्यार, देखभाल और स्नेह के सुंदर संबंधों को दर्शाता है।
इस दिन बहन अपने भाई की कलाई के चारों तरफ एक धागे को सुरक्षा के प्रतीक के
 रूप में बांधती है, और वह उसकी रक्षा और ख्याल रखने का वादा करता है।
नेपाल में रक्षाबंधन को जनाई पूर्णिमा कहा जाता है. सभी भारतीय त्यौहारों
की तरह, राखी के त्योहार से भी कई कहानियां जुडी हैं। तो आईये जानते है...........
जानिए रक्षाबंधन से जुडी कहानियाँ
जानिए रक्षाबंधन से जुडी कहानियाँ raksha bandhan stories in hindi
रक्षाबंधन पूरे विश्व में हिंदुओं द्वारा मनाए जाने वाले सबसे
महत्वपूर्ण त्योहारों में से एक है जो श्रावण मास की पूर्णिमा को मनाया
जाता है । यह त्योहार भाई और बहनों के बीच प्यार, देखभाल और स्नेह के सुंदर
संबंधों को दर्शाता है। इस दिन बहन अपने भाई की कलाई के चारों तरफ एक धागे
को सुरक्षा के प्रतीक के रूप में बांधती है, और वह उसकी रक्षा और ख्याल
रखने का वादा करता है। नेपाल में रक्षाबंधन को जनाई पूर्णिमा कहा जाता है.
सभी भारतीय त्यौहारों की तरह, राखी के त्योहार से भी कई कहानियां जुडी हैं।
तो आईये जानते है
history of raksha bandhan in hindi
कृष्ण और द्रौपदी
महाभारत की एक कथा के अनुसार भगवान कृष्ण ने शिशुपाल का वध करने के लिए
जब सुदर्शन चक्र का इस्तेमाल किया तब उनकी तर्जनी ऊँगली में चोट लग गई . तब
द्रौपदी ने अपनी साड़ी के एक हिस्से को फाड़ दिया और इसे कृष्णा की उंगली
के चारों ओर बांध दिया जिससे रक्तस्राव रुक गया । इसके बदले, कृष्ण ने संकट
के समय द्रौपदी को बचाने का वादा किया।
यम और यमुना :
एक अन्य कथा के अनुसार, मृत्यु के देवता यम ने अपनी बहन यमुना को 12 साल
से नहीं देखा था। यमुना दुखी थी और उन्होने गंगा से परामर्श किया. गंगा ने
यम को उनकी बहन यमुना का याद दिलाया, जिसके बाद यम अपनी बहन से मिलने गए.
यमुना अपने भाई को देखकर बहुत खुश हुई, और यम के लिए उपहार के रूप में भोजन
तैयार किया। भगवान यम प्रसन्न हुए और यमुना से पूछा कि उन्हें क्या उपहार
चाहिए । यमुना ने कहा कि वह, उनसे मिलने फिर दुबारा आये. । यह कहानी भारत
के कुछ हिस्सों में भाई दूज नामक एक त्योहार का आधार है...
अलेक्जेंडर की पत्नी रोक्साना और किंग पोरस
एक कहानी अनुसार, जब सिकंदर महान ने 326 ईसा पूर्व में भारत पर आक्रमण
किया, तब उनकी पत्नी रोक्साना ने पोरस को एक पवित्र धागा भेजा,और उससे कहा
कि लड़ाई में वे उनके पति को नुकसान नहीं पहुचाये. परंपरा के अनुसार, कैकेय
साम्राज्य के राजा पोरस ने राखी के प्रति पूर्ण सम्मान दिया । हाइडस्पेश
की लड़ाई में, जब पोरस ने अपनी कलाई पर राखी को देखा तब ऊसने खुद को सिकंदर
पर हमला करने से रोक दिया।
रानी कर्णावती और सम्राट हुमायूं
1535 CE में जब चित्तौड़ के रानी कर्णावती को एहसास हुआ कि वह गुजरात के
सुल्तान, बहादुर शाह के आक्रमण से अपने राज्य का बचाव नहीं कर सकती तब
उसने सम्राट हुमायूं को एक राखी भेजी. कहानी के अनुसार, हुमायूं चित्तौड़
की रक्षा के लिए अपने सैनिकों के साथ रवाना हो गए आर सुल्तान बहादुर शाह के
साथ युद्ध करके उनके राज्य की रक्षा की
यह कुछ चुनिन्दा कहानियाँ है जो भाई बहन से जुड़े इस अटूट त्यौहार से जुडी है.....
Jio Phir se Aap Logo Ke Liye Leke Aaya Hai Ek Dhamaka Offer, Free Internet K Baad Ab Jio Apna Free Mobile Leke Aaya hai !! Jo Aap Logo Ko Bilkul Free Me Milega, Jiska Aapko Wait Nahi Karna Padega, Ye Jio Free Phone Launch Ho Chuka Hai, Ye Koi Normal Phone Nahi Hai Is Phone Me Aapko 4G Support Milega, Is Phone Ki Puri Detail Mai Apko Is Article Me Batane Ja Raha Hu.......
RELIANCE JIO FREE SMART PHONE KE BARE MAI ( रिलायंस जियो स्मार्ट फ्री स्मार्ट फ़ोन के बारे मैं )
Reliance Industry ke malik Mukesh Ambani ne fir se India mai halchal macha di hai. Unhone india mai 50 crore Free Jio feature Phone customers ke liye launch kar diye hain..!! Smartphone ki khoobiyo wala yeh 4G support phone hai..!!
Is Phone ka naam JIO PHONE
rakha gya hain..!! Mukesh Ambani ne chokate huye kha ki jio phone ke
customers ke liye yeh free mai milega..!! To dosto ab jante hai Jio
Phone ke bare mai..!!
JIO PHONE FREE KESE MIL RAHA HAIN ( जिओ फ़ोन फ्री कैसे मिल रहा है )
Dosto Aap sabhi log sochre honge ki jio phone free kese milra hain..!!
Mai aapko bta du ki is phone ko lene ke liye aapko pehle 1500 dene
padege fir yeh phone free kese huwa??? Mukesh Ambani ne kha yeh 1500
aapse security money ke taur par liya jayega..!! 3 saal baad phone ko
wapis karne par kabhi bhi aap apne ₹1500 wapis le sakte hain.!! Phone ko
free mai dene par iska durupyog karne ka khtra hota hain..!! Is liye
yeh ₹1500 security ke taur par liya ja raha hain..!! Aapko apne rupey 3
saal baad wapis mil jayege..!! Isliye ye phone aapke liye bilkul Free
hain..!!
JIO PHONE FEATURES ( जिओ फ़ोन के फीचर्स )
▶ Voice calls hmesa Free ( ji ha bilkul free )
▶ Internal Memory 4GB
▶ Memory expand to 128GB
▶ 2.4 inch OVGA Display
▶ VGA Rear Camera
▶ Alphanumeric Keyboard
▶ 22 language supported
▶ 5 number ke button ko der tak press kar kai pehle se save number par
emergency alert jayega..!! Jisme us number ki location bhi hogi
▶ Tourch, FM, Ringtone
▶ Jio apps Preloaded
▶ Jio Cinema App Preloaded
▶ Aap isko TV se bhi Connect kar sakte hain..!!
jIO PHONE OFFERS
⏩ ₹153 mai Unlimited Data Plan or Voice Calls Free mai milega..!!
⏩ ₹309 ka plan lene ke baad aap is jio phone mai free TV bhi dekh sakte hain..!!
JIO PHONE FREE MAI KESE OR KAHA MILEGA ( जिओ फ़ोन फ्री मैं कैसे और कहाँ मिलेगा )
Jio phone 15 august ko kuch users ke saath iski testing karne ja raha
hain..!! Sabhi customers ke liye yeh phone 24 august se available
hoga..!! Yeh phone aap MY JIO APP ya JIO RETAILER STORE se Pre-Booking
kara sakte hoo..!!
PEHLE AAO-PEHLE PAO ke
aadahar par September me is phone ki delivery start ho jayegi..!!
Mukesh Ambani ne kha hai ki har hafte 50 lakh jio phones customer tak
phuchane ka lakshay rakha gya hain..!! Desh mai sabhi customer ke liye
is phone ko phuchane ka target bhi hain..!!
KYA MUJHE YEH PHONE LENA CHAHIYE ( क्या मुझे ये फ़ोन लेना चाहिए )
Guyz mere hisab se yeh phone aapko lena chahiye..!! Kyoki esa offer aage
kbhi nhi aane wala hai..!! Phone lete waqt aapko ₹1500 dene hai..!! Or 3
saal baad aapko apne wo ₹1500 wapis mil jayege..!! Means phone free
hain..!! 3 saal tak aapko Jio phone par free calling milegi jo ki iski
bhut khash baat hain..!! Or sasta data pack, Live TV, or bhi khi offer
hain jinka aap is phone ke saath use kar sakte hoo..!! Bilkul dhamaka
offer hain..!! Jio phone ko free mai khridne kai is offer ko haath se na jane dai..!!
Agar aapko jio phone ke bare mai or kuch bhi janna hai to aap comment
mai puch sakte ho..!! Is post ko sahre karna na bhule..!!
स्नैपडील ने फ्लिपकार्ट के
साथ अधिग्रहण को लेकर बातचीत समाप्त कर दी है. कंपनी ने कहा है कि वह अपना
कामकाज जारी रखेगी और ‘स्वतंत्र तरीके से रास्ते पर आगे बढ़ेगी.’ ऐसी
खबरें थी कि स्नैपडील अपना कारोबार फ्लिपकार्ट को 90 से 95 करोड़ डॉलर में
बेचने के लिये बातचीत कर रही है.
स्नैपडील के प्रवक्ता ने फ्लिपकार्ट का नाम लिये बिना ई-मेल के जरिये दिये
बयान में कहा, ‘‘स्नैपडील पिछले कई महीनों से रणनीतिक विकल्प तलाश रही थी.
कंपनी ने अब स्वतंत्र रास्ता अपनाने का निर्णय किया है और इसके
परिणामस्वरूप जारी सभी रणनीतिक वार्ता समाप्त कर रही है.’’ कंपनी ने कहा कि
यह मजबूती के साथ नई दिशा स्नैपडील-2 है और हमने इस महीने सकल लाभ हासिल
कर इसे क्रियान्वित करने की दिशा में उल्लेखनीय प्रगति हासिल की है.
बयान के
मुताबिक, ‘‘इसके अलावा कुछ गैर-महत्वपूर्ण संपत्ति को बेचकर ऐसी उम्मीद है
कि स्नैपडील वित्तीय रूप से आत्मनिर्भर कंपनी बन जाएगी.’’ कुछ ही दिन पहले
कंपनी ने डिजिटल भुगतान प्लेटफॉर्म फ्रीचार्ज एक्सिस बैंक को 385 करोड़
रुपये में बेचने पर सहमति जताई. उसके बाद उक्त बात सामने आयी है.
घरेलू
ई-वाणिज्य खंड की प्रमुख कंपनी स्नैपडील को अमेजन और फ्लिपकार्ट जैसी दूसरी
कंपनियों से कड़ी प्रतिस्पर्धा का सामना करना पड़ रहा था. इससे उसकी
वित्तीय स्थिति पर असर पड़ा.............